K3UK's Quick and Dirty Guide to Narrow Bandwidth SSTV
This page has been reproduced with permission from Andrew O'Brien K3UK
K3UK's Quick and Dirty Guide to Narrow Bandwidth SSTV
Version 1.4 27 Jan 2008.
by Andrew O'Brien
Introduction
The idea behind recent experiments with narrow band analogue SSTV transmissions is simply an attempt to redefine some common practices among SSTV amateurs. The redefined practices attempt to "fit" SSTV QSOs into the normal operations of the digital radio enthusiasts. PSKers, MFSK operators, and Olivia users are used to navigating a specific section of the bands, and are used to digital rag-chews that exchange signal reports, station info and general operator info (e.g. "been a ham 100 years"). In North America the SSTV enthusiasts have tended to congregate on a couple of frequencies and participate in voice conversations between the sending of pictures. Typical PSKers enjoy QSOs without having to use a microphone. At times, QSOs can be had without disturbing others in the household late at night.
In order for the SSTV signals to be located in the typical PSK31/Olivia/MFSK portions of a band, the SSTV signal must be less than 500 Hz in width. Most common SSTV modes are much wider than this, but lo-and-behold, several hams have recently reminded us that narrow band SSTV has been added to MMSSTV. So now digital radio folks can have SSTV QSOs in the same frequency ranges as their other QSOs. This has a special appeal if you like to use the 30M band. This band, for USA hams, is assigned to CW and Data modes. 30 meter enthusiasts can use narrow SSTV and user "text overlays" to communicate reception reports, QTH, station information, etc.
How these QSOs should be conducted has yet to be firmly established. Some have suggested having the usual PSK/MFSK/DominoEX type QSOs and switching to MMSSTV when a picture needs to be sent. MMSSTV has some interesting abilities where one can actually "keyboard" within the picture. With the concept of "a picture is worth a thousand words" in mind, here is how MMSSTV might be used in narrow mode.
The Software
Download the latest version of MMSTV (it is totally free). Install it as per the help file within MMSTV. Load the software and configure the software as instructed in the help file (OPTION, then SETUP MMSTV). Click on the TX Tab to configure your PTT port, if you need help with this...drop an email to the digitalradio reflector.
The Narrow Modes
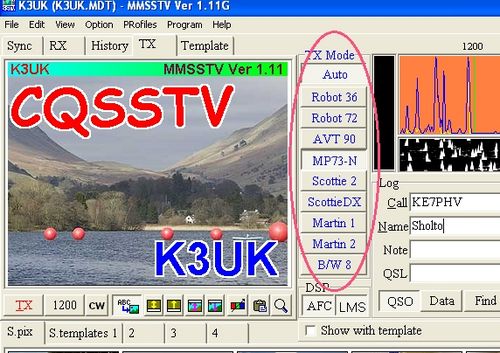
When you first boot up MMSSTV and click on the TX button you should see something like the illustration below
You will not see the picture that I have used, you will need to create your own, but more on that later.
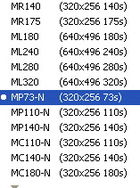
Note the red ellipse that I have used to highlight where you choose the mode, you will not see MP73-N initially but if you RIGHT-CLICK on any of the modes, a long list of modes will appear. Scroll down until you see MP73-N.
There are other narrow modes but at this point we are experimenting with MP73-N so just select that and it should now appear among your preferred list of modes to transmit with.
That's it. There are a few small tweaks that you may want to enact later. We'll save that for a revised edition of the help file.
Receiving
MMSSTV in default mode should auto-detect any mode, so if you are tuned in close enough (and the signal is strong enough) decoding of a picture should be automatic. To see the picture as it is being received you need to make sure you have clicked on the RX tab in MMSSTV. To make sure you have "auto-sync" enabled click on the RX tab. RIGHT-CLICK on the receive picture frame and select "auto slant adjustment". See the MMSTV help file for more details.
SSTV "Keyboarding" and Rag Chews
As mentioned before MMSTV can do some really nice things to spice up the usual digital QSO. Instead of a PSK31 "brag tape" that details your station, you can send a detailed photograph of your station in perhaps less time than you could send that PSK31 "brag tape". Instead of the brag tape you could simply send:
Getting MMSTV To Do All This
It is fairly simple, the MMSSTV help files will assist you but just to get you going, here are a few tips.
1. Get a few pictures. I am proposing that we don't get carried away and send interesting pictures from the Internet. I am recommending that the pictures graphically represent the data you would have typed had you been using PSK31 or some other digital mode. We usually send call sign, their call sign, signal report, your QTH equipment info, weather info and perhaps a bit about yourself (age here is 125, etc). Thus, perhaps a picture of your shack, maybe one of your antenna, a picture of YOU, a picture of your house or your village. You may already have your pictures on your computer but if you do not....get that digital camera out and snap a few and import into MMSSTV.
Importing your pictures
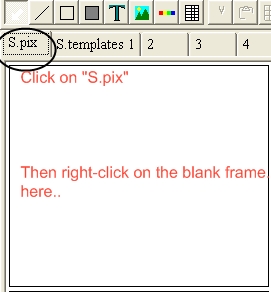
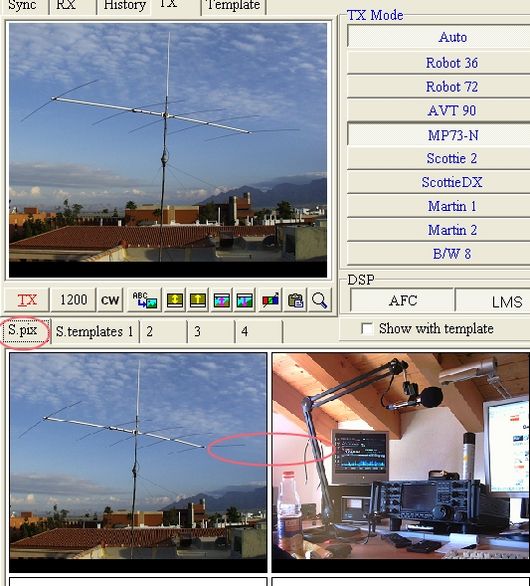
In the MMSSTV main window click on the S.pix option to set-up the pictures you will be eventually transmitting.
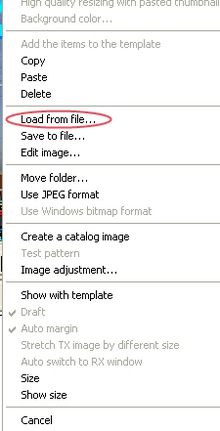
When you right-click you then need to select "load from file" option.
Then simply point to the folder you have your pictures in, click "OK" after the picture is loaded and the picture will then appear within MMSSTV. Repeat this in the other frames for as many pictures as you feel you need.
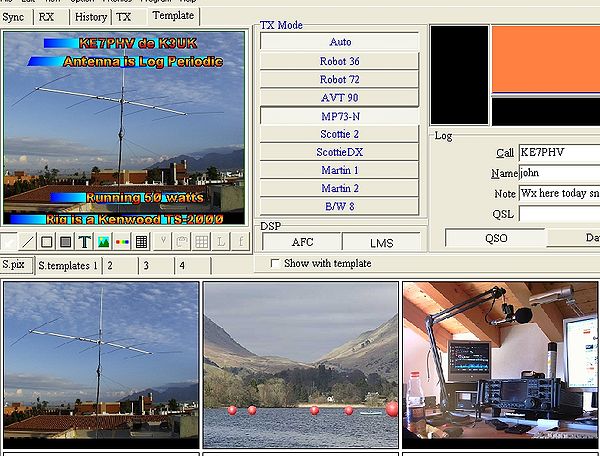
Mine looks like this...
OK, Now The Fun Part
So far, we have not done anything that is much different than traditional SSTV operations that you can find on 14230, other than discuss use of a narrower mode. What I am proposing is that we use the "template" functions within MMSSTV (or other SSTV software that permit narrow modes) and include text among the pictures. Here is how I do this (there may be a simpler way but I am still new at this).
First create a few basic templates that represent the typical text that you might send in PSK31. Keep it brief because you are sending a small picture, you don't want to have too much text cluttering up the screen. Let your picture do the talking, use the template text to add a little.
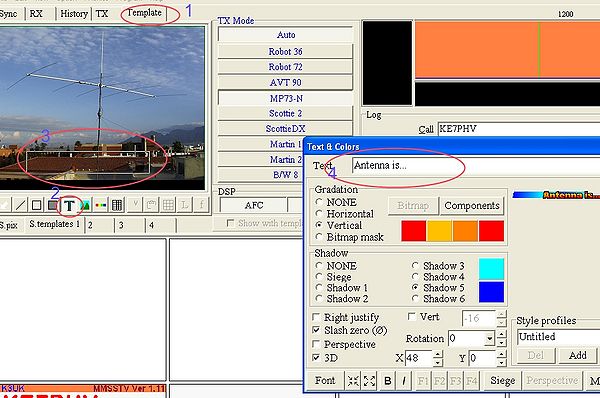
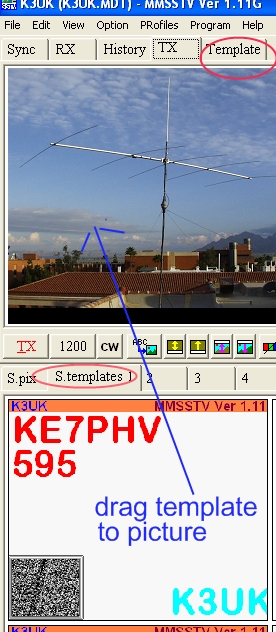
First CLICK on TEMPLATES (see step one below). Then click on the "T" icon, step 2 below. This enables the ability to add text to your pictures. Now the slightly trick part. You have to tell MMSSTV where in the picture you want the text to appear. To achieve this you RIGHT-CLICK and drag (at the same time) on the picture and a box appears on the picture, see step 3 below. The box size varies as you drag your mouse. Choose a size that you think is appropriate, I choose a size that will be big enough to be actually read by the receiving station, but not too big that it overpowers the picture. When you let go of the right-click, a "text and color" dialog box opens up. Here you can be really creative and choose all kinds of font sizes, fonts, colours, and 3D effects. I'll let you practice on your own, I kept mine quite simple. You can also "drag" the text box to other areas of your picture if you change your mind later.
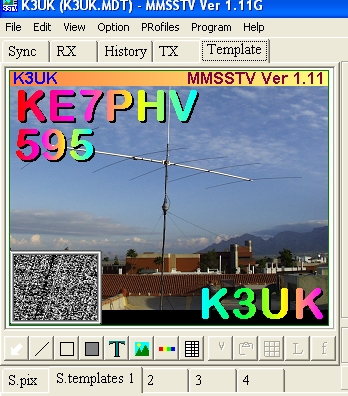
Step 4 in the above picture allows you to type in the text that you will insert into the picture. If you want to have text appearing at different parts of the picture you need to repeat the aforementioned. Place the mouse over the part of the picture you want to add new text, right-click again and create your new text box. This is how I achieved the following picture and text
I am sure you can do better than I.
MMSSTV HAS USEFUL MACROS
Things have come full circle in my ham radio writing life. When digital modes via sound cards were new, I wrote the very first English language help file for a new application called MMTTY. Little did I realize that years later I would be writing again about the macros within MMTTY. MMSSTV is by the same author as MMTTY, and thus has the same macro command set. In the above text and colors window, you will see a button marked MACRO.
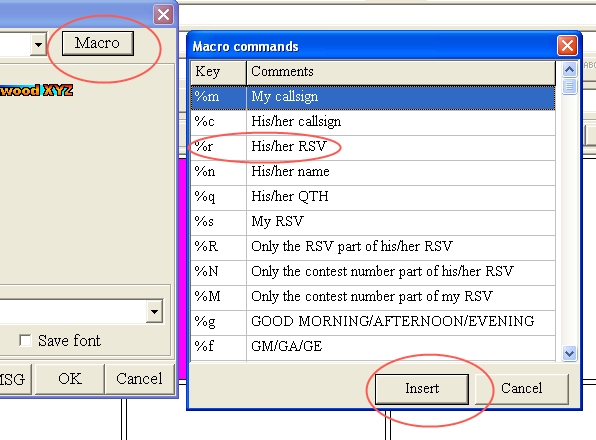
When you click on MACRO a list of macro commands open up in a new window. For example %r will insert the signal report that you will be giving the station you are working. The RSV comes from the log section of MMSSTV and the macro will automatically insert the RST that you will type into the log as you are working the station (before you send the pictures). You can choose any of the macros that suit your need but remember you need brief ones to fit into your pictures. After you have chosen the macro and added a little text click INSERT. Your text and macro will appear superimposed over the picture.
One of the most useful macros is the NOTE macro (%o). The beauty of this macro is that you can actually keyboard a little in the QSO. Whatever you type in the NOTE section of MMSSTV's log will appear in the picture that you will send next.
Play around with this and you can become quite creative with what you can fit into a picture that is ready to be sent when it is your turn to transmit. Since the first edition of this guide I have had the opportunity to have a few narrow SSTV QSOs. Using the text templates to answer/ask a question or state some information takes some getting used to. It can easily be achieved but you will probably need to get used to it at first. In typical digital mode QSOs, like PSK31, operators often "type ahead". They start typing their response while the other station is transmitting. The NOTE field and NOTE macro in MMSSTV give you this opportunity. If you are in the middle of copying a picture but can already tell it is of poor quality, you can type ahead in the NOTE box (in MMSSTV's log). Something like "Pic received but poor copy" will suffice. Similarly, you could add "great looking shack there" if you see a shack clearly in the picture". As previously stated, play around with all the macro and some of the log fields that automatically get inserted into the transmitted text from your creative templates. Eventually you can have enough templates that act like macros in traditional digital mode software, and can have "conversation" just as effectively as other modes.
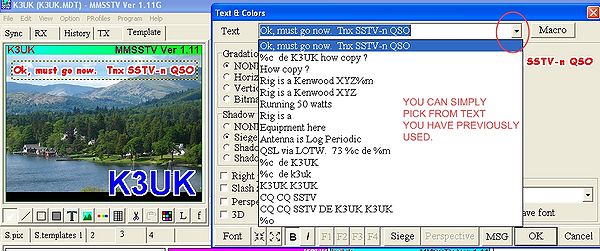
You can also use text that you have previously typed in and select from a list as illustrated below
To do this, while in the Template tab, double-click on a template text you have inserted in the picture and the "colors and text" window will open up, then click on the down-arrow as seen in the above picture.
A Bit More on Templates
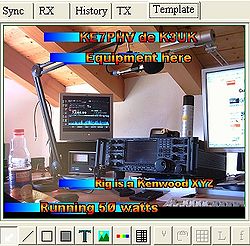
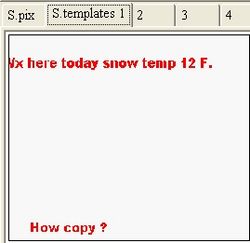
You need to realize that templates can be superimposed on ANY picture you choose - the templates are independent of the pictures. Above, you see four templates without the pictures. There may be a better way but the method I used to achieve this is to... make sure I am in S.template mode (click S.template) and then drag the picture from the transmit frame in to an empty template frame.
Note that the actual picture does not appear, just the template.
You can mix and match the templates with any picture.
Click on S.pix tab, decide which of your available pictures you want to send and then double-click on the picture. It will appear in your transmit frame.
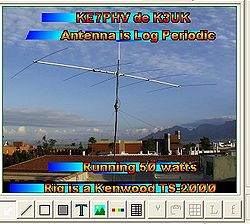
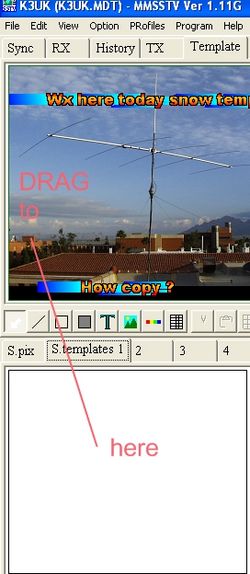
Notice there is no template or text superimposed over the picture. To get the text superimposed click on templates, choose whatever template you want to use and DRAG it to the picture.
When you have dragged it you will then see the picture with the template text.
Frequencies
Where you operate is dependent on the rules set by your governing agency. In the USA hams have quickly settled on 10132 and 7077 as useful frequencies for narrow mode SSTV. Remember you can use other parts of the assigned sub-band. If 10132 or 7077 is occupied with other signals, please move to a frequency that is open and one that is at least 400 Hz from where they are operating. You can also just wait until your favourite frequency appears clear, ask if they frequency is in use via CW (QRL?) or by some other digital mode centered around 10132 plus 2000 Hz or 7077 plus 2000 Hz.
Joe N8FQ has created a very useful web page which can be found at 30mwebcam. It monitors 10132 USB. If you are heard your picture will be displayed. You can see the 30 most recent pictures that Joe has received via 30m history
In the South Pacific you might also want to monitor the VK2QQ web page. The VK2QQ website displays SSTV images that VK2QQ's station has decoded. Currently 10132 is monitored but 20M and 2M are also used.
Sample QSO's
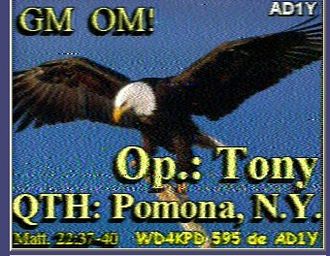
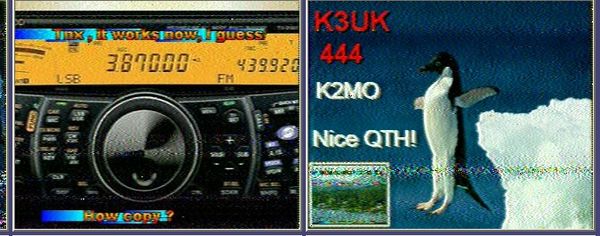
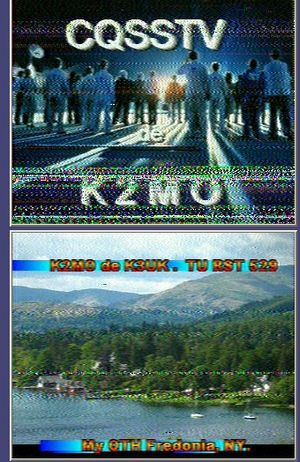
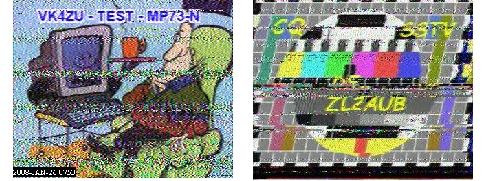
Here are a few actual QSOs that Joe's page has captured. They illustrate how text is added to assist in the QSO.
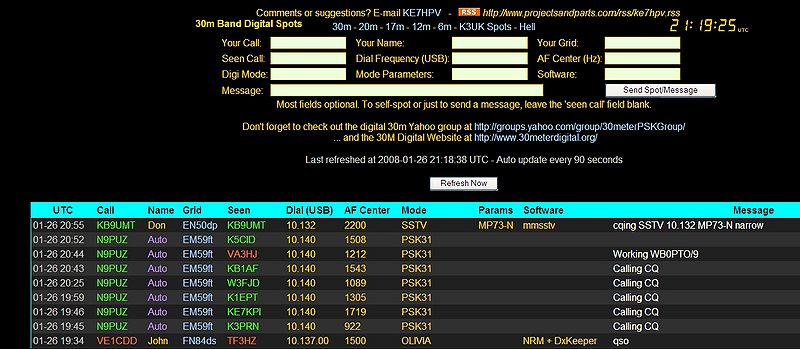
There are also a couple of useful "spotting" pages that you can use to drum up business. K3UK spotter and click on the DIGITALRADIO link or try the 30M Digital Link for a spotting page that looks like this.
Hopefully this will get you started. Please experiment both with the mode and with the creative part of the software. Please email me any suggested improvements. You should also realize that this is analogue SSTV, the picture quality is dependent on how well your signal was received. Any text you superimpose may difficult for the other station to read if the picture/data quality is poor. You can use the ideas contained within this document for other wider SSTV modes, but please remember that in the USA, any SSTV wider than 500Hz is considered "image" and needs to be within the parts of the bands designated for image transmissions, NOT data sub-bands.
For reception and transmission functions please use the MMSSTV help files.
Quick Overview of SSTV and other picture sending modes
With the experiments here in the past week we can redefine the basic guide to SSTV. In fact, I am not sure term SLOW-SCAN fully applies any more. Here is a quick view:
Wide Analogue SSTV: Exceeds 500 Hz wide and thus in the USA requires the frequency used to be within the portions of the bands defined for "image". Most popular frequency is 14230. Used to exchange pictures, operator use voice SSB on same frequency to discuss pictures and the mode in general. MMSSTV and Multipsk are popular software for these modes. DM780 has a pending beta that also supports these modes.
Narow Analogue SSTV. Using SSTV modes that are less than 500 Hz appears to allow USA operators to utilize the the same portion of the bands assigned to other digital modes like PSK31 or RTTY. The picture sent is viewed as "data". Modes such as MP73-N (found in MMSSTV) are used with text overlays for signal reports, etc. SSB voice transmissions are not used between transfers. Most used frequencies seem to be 10132 and 7077.Not sure about other countries.
MFSK16 with pictures. Multipsk and Mixw allow for a digital QSO with MFSK16 and switch to a narrow mode picture transfer method when the users decide. Pictures are small. Use the same frequencies that you normally use MFSK16. Try 14077, 7035, 7077.
Digital SSTV: Easypal, Hampal and other digital SSTV applications transfer pictures digitally rather than analogue. The received picture quality is a good as the original picture. These applications use a method that has some error detection. The software detects "segments" of a picture that are not received fully, at the end of the transfer the receiving station sends a "BSR" (Bad Signal Report) alerting the originating station as to which segments were not correctly received. The originating station then sends a "fix", sending just the segments the other station needed. This software can also be used for general file transfers. There is quite a bit of activity, look first for signals on 14233. VK2DSG advises : "... When using EasyPal you should always check to see that you use the mode which is most suited to the path at the time of the day A modes generally on very quiet bands VHF ETC B modes on 20/30 m and above - Sometimes you may get away using slower A modes E modes generally on 40m and 80m. See under Action/Quick select TX mode for recommendations. You should always use the RS encoding system in the program Encode 1, 2, 3, 4. Select the encode to suit the conditions ..."
RFSM2400: I have included this software in the discussion of SSTV because, like digital SSTV, it is more of a file transfer program. You send your pictures as a file and, if received, the picture is
as good as the original. It works under the standard MIL-STD-188-110A. The file transfers utilize a rather broad bandwidth and also use a automatic error correcting method. In the USA there are limits on how/where the software can be used in the amateur bands, but there is much activity with this mode in Europe, Canada, and Australia.
Others: WinDRM and DigiTRX also allow file transfers similar to Easypal, thus pictures can also be sent. With WinDRM you can also talk via digital voice.
Andy K3UK
andrewobrie@gmail.com
| Modes of operation | |
| Modes | CW * AM * FM * SSB * Digital * Echolink * Emission Classification * IRLP * Optical communications |
| Packet | APRS * D-Star |
| SSTV and ATV | SSTV frequencies * SSTV Modes |
